In this tutorial we’ll be setting up a Raspberry Pi for use as an infrared remote control. If you use your Raspberry Pi for watching videos there might be better ways for controlling a TV, like HDMI-CEC if your TV supports it.

For this project you will need:
- Raspberry Pi
- Breadboard
- 1x IR LED
- 1x IR Receiver
- 1x 10k Ohm Resistor
- 1x NPN Transistor
- Jumper Wires
To control the TV from the Raspi, we’ll use LIRC (the Linux Infrared Remote Control package). Check the LIRC remotes database to see if someone’s already contributed the codes for your TV. If it’s in there, you’re in luck! And you don’t have to buy an IR Receiver.
1. Setup
Install LIRC:
$ sudo apt-get update
$ sudo apt-get install lirc
Download the project files so you’ll have a basic web remote:
$ cd ~
$ git clone https://github.com/fbradley8/raspi-tv-remote
Then download the required packages:
$ cd raspi-tv-remote
$ npm install
2. Configuration
Update the LIRC configuration file to use your infrared receiver:
$ sudo nano /etc/lirc/hardware.confMake the following change:
DRIVER="default"
DEVICE="/dev/lirc0"
MODULES="lirc_rpi"
Update the boot config:
$ sudo nano /boot/config.txtAdd the following line:
dtoverlay=lirc-rpi,gpio_in_pin=17,gpio_out_pin=18To make these changes we need to reboot the pi, but the next step is wiring so we might as well shut it down for now.
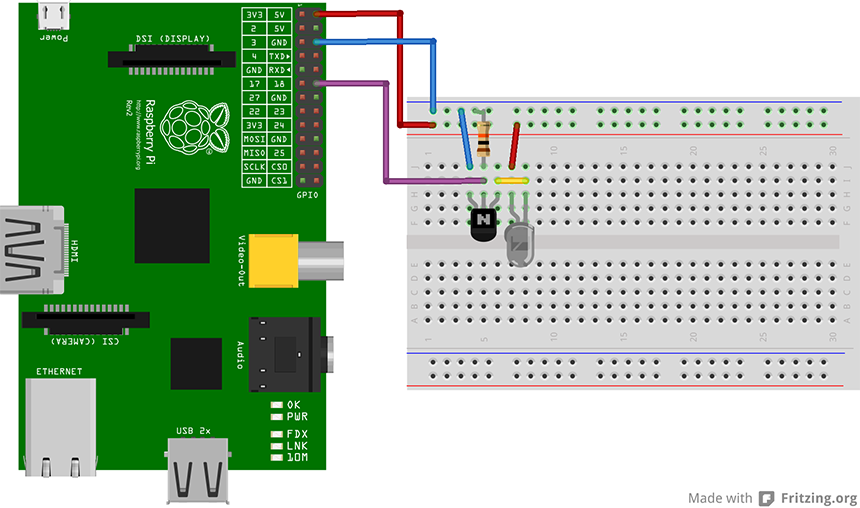
3. Wiring
Using the required components, copy this wiring diagram.
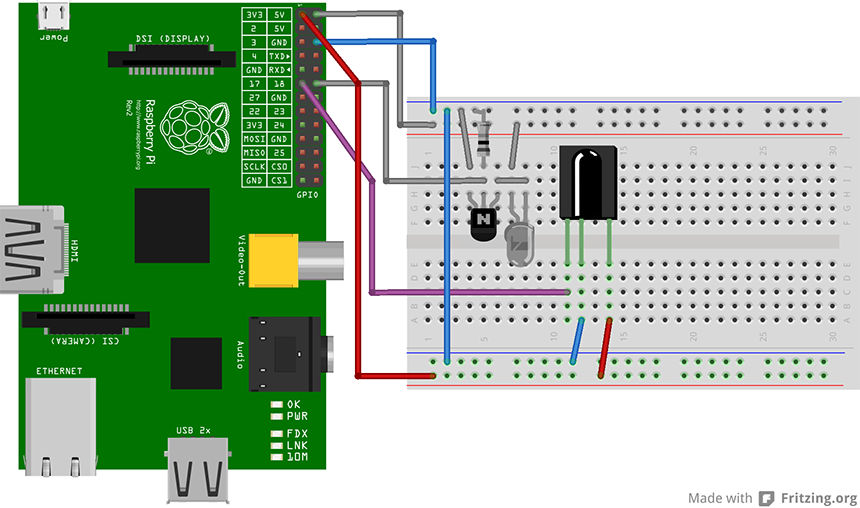
If your remote wasn’t listed in the LIRC remotes database, you’ll also need to wire up the IR receiver.
4. Programming
Boot the pi back up and run:
$ irrecord -d /dev/lirc0 ~/lircd.confProgram in as many keys as you like and then move the config file and restart the service.
$ sudo mv /etc/lirc/lircd.conf /etc/lirc/lircd_old.conf
$ sudo mv ~/lircd.conf /etc/lirc/
$ sudo /etc/init.d/lirc restart
5. Test
If all is working fine, you should now be able to successfully run the following (assuming you named your TV Element and the power button key_power):
$ irsend SEND_ONCE Element key_power6. Setup your web-remote
Start the web server to view your webapp:
$ cd ~/raspi-tv-remote
$ npm start
Now browse to your pi’s IP on port 8080 ex: http://x.x.x.x:8080
If you programmed your remote using the same namespacing as mine, it should work! If not don’t worry. All you have to do is modify the id’s of the keys in raspi-tv-remote/public/index.html.
The power button, for instance, has the ID attribute “key_power”. If you set the power button as something else, replace this ID with that.
Wrap-up
Hopefully this tutorial got you up and running with a useable raspi-powered IR remote. The project files are fairly straightforward and you should easily be able to add other keys to the web interface.